Authors : Georges Goebel, Marc Calvisi, Rod Schultz, Jerome Pioux, Benoit Pelletier
October 16, 2006
Version : 3.2
Load balancing at web level with mod_jk
Session Replication at web level
Session Replication at EJB level
Clustering databases with C-JDBC
SampleCluster2 Practical Example
Installing Java, Ant and JOnAS / Tomcat
Description of the sampleCluster2 Web Interface
This guide describes how to configure Apache, Tomcat, and JOnAS to install a cluster.
Clustering with JOnAS uses the following:
This document describes one architecture with all the clustering functionalities available in JOnAS, the configuration of architectures integrating one of those functionalities, and other possible configurations.
For hands-on practice, this document uses the sampleCluster2 JOnAS example.
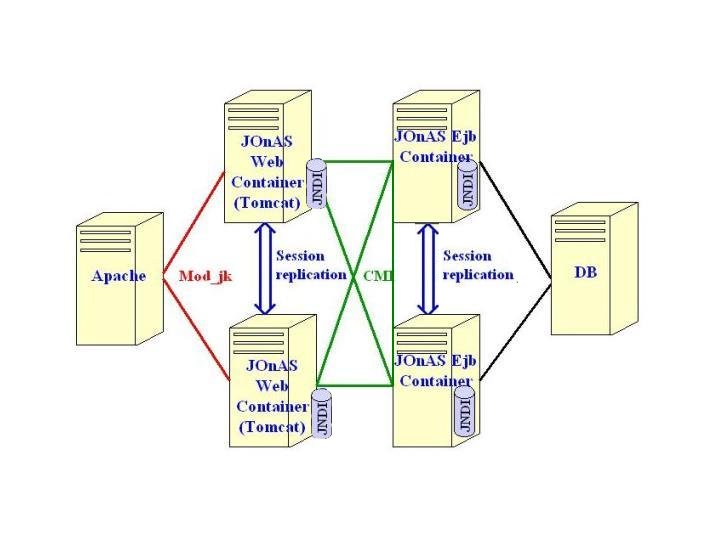
The architecture shown in the following illustration provides all the clustering functionality available in JOnAS: 1) Apache as the front-end HTTP server, 2) JOnAS/Tomcat as the J2EE Container, and 3) a shared database.
This architecture provides:
At the Servlet / JSP level, the mod_jk plug-in
provides Load Balancing / High Availability and the
Tomcat-Replication module provides Failover.
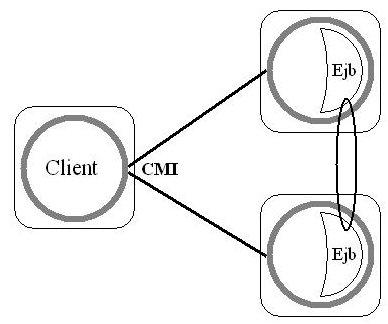
At the EJB level, the CMI protocol and JNDI replication provides Load Balancing / High Availability.
Replication of Stateful EJBs provides failover.
The database is shared by the JOnAS servers.
The sampleCluster2 application, presented later in this document, can be deployed on such an architecture.
|
|
A node (computer) that hosts one or more servers |
|
|
|
|
A web container |
|
An ejb container |
|
|
A JOnAS instance that hosts a web container |
|
A JOnAS instance that hosts an ejb container |
|
|
A JOnAS instance that hosts a web container and an ejb container |
|
|
|
|
An Apache server with the mod_jk module |
|
|
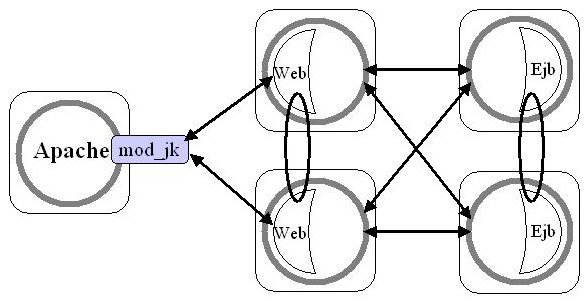
The following illustration describes how Apache, mod_jk, and JOnAS/Tomcat Containers interact:
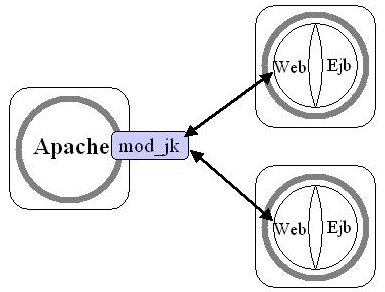
This example uses mod_jk, but an alternative configuration using Enhydra Director is also possible. (see config)
Mod_jk is a plug-in (module) that handles the communication and load balancing between Apache and Tomcat.
Mod_jk uses the concept of worker. A worker is a Tomcat instance that is running to perform servlet requests coming from the web server. Each worker is identified to the web server by the host on which it is located, the port where it listens, and the communication protocol that is used to exchange messages.
AJP13 is the preferred TCP/IP sockets protocol that mod_jk uses for communicating between the web server and Tomcat workers.
In this configuration there is one worker for each Tomcat instance and one worker (this is a specific worker with no host and no port number) that will handle the load balancing. All workers are defined in a file called worker.properties.
Note: this module can also be used for site partitioning.
The following illustration shows that the HTTP session replication feature has been added to the architecture:
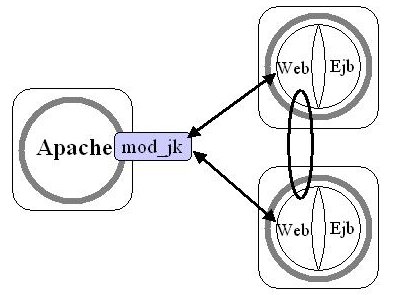
The term "session replication" is used when the current service state is being replicated across multiple application instances. Session replication occurs when the information stored in an HttpSession is replicated from, in this example, one servlet engine instance to another. This could be almost any type of data, such as items contained in a shopping cart or information being entered on an insurance application. Anything being stored in the session must be replicated for the service to failover without a disruption.
The solution chosen for achieving Session replication is called all-to-all replication. Tomcat uses a proprietary protocol based on TCP for the all-to-all replication.
The following illustration shows that load balancing at EJB level is now included in the architecture:
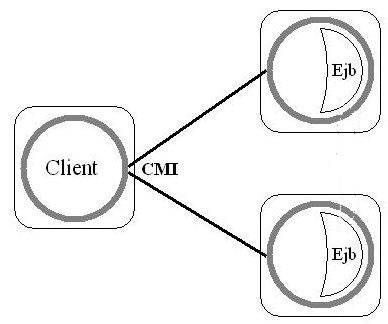
CMI is a new ORB used by JOnAS to provide clustering for load balancing and high availability. It provides replication of the JNDI registries among all EJB containers. Several instances of JOnAS can be started together in a cluster to share their EJBs. It is possible to start the same EJB on each JOnAS, or to distribute their load. A URL referencing several JOnAS instances can be provided to the clients. At lookup time, a client randomly chooses one of the available servers to request the required bean. Each JOnAS instance has the knowledge (through JGroups) of the distribution of the Beans in the cluster. An answer to a lookup is a special clustered stub, containing stubs to each instance known in the cluster. Each method call on the Home (or Remote for the SSB) of the bean can be issued by the stub to a new instance in order to balance the load on the cluster. The default algorithm used for load distribution is currently a weighted round robin with local preference.
The following illustration shows that the EJB session replication feature has been added to the architecture:
The term "session replication" is used when the current service state is being replicated across multiple application instances. Session replication occurs when the information stored in an SFSB state is replicated from, in this example, one EJB container instance to another. This could be almost any type of data (that is serializable), such as items contained in a shopping cart or information being entered on an insurance application. Anything being stored in the session must be replicated for the service to failover without a disruption.
The solution chosen for achieving Session replication is based on a horizontal approach implemented both through CMI and the JOnAS's ha service. See here for more detailed information
With C-JDBC it is possible to cluster databases. Refer to HowTo setup a C-JDBC Database.
sampleCluster2 is an application that demonstrates the clustering features. A jsp/servlet follows the requests movements across the cluster. As shown in the illustration below, it can be deployed over four JOnAS instances. Two have WEB containers and the other two have EJB containers.
The application is composed of three EJBs: a stateful session bean, a stateless session bean, and an entity bean. These EJBs are instantiated by the web interface. When the user connects to the web interface for the first time, an HTTP session is created. During this process a stateful session bean is created in one of the JOnAS nodes where the EJB container is started. The handle of this stateful session bean is added to the HTTP session (see note). Next, the web interface creates a new instance of the stateless session bean. The first time, no entity bean is created. The useful information from the stateless session bean (JOnAS node name, number of instances) is set in the stateful session bean.
The user can see the result in the web interface where all the necessary information is displayed. The user should now execute the same servlet several times in order to see the changes made by the cluster. Each time the servlet is executed, it may be executed on a different node (JOnAS with web container).
The servlet gets a reference to the stateful session bean (through the handle). After that, a new stateless session bean is created and its information is passed to the stateful session bean. On every tenth instantiation of the stateless session bean, an entity bean is created.
However, the stateless session bean may be instantiated in a different EJB container than the stateful session bean. This sample uses local interfaces between the stateless session bean and the entity bean. As a result, the entity bean is created in the same EJB container as the stateless session bean.
The entity bean writes the time and the name of the node in the database.
Note: The handle enables getting a reference to the stateful session bean when the JVM has changed.
See also description of the SampleCluster2 Web interface for a description of using sampleCluster2 to demonstrate cluster features.
This section provides information about installing JOnAS /Tomcat, Apache, mod_jk.
The versions assumed here are: JOnAS 4.8.x /Tomcat 5.5.x, Apache 2.2.x, and mod_jk 1.2.15 (or later).
Perform steps one through three in Installing JOnAS with a web container from scratch.
Linux Notes:
export JAVA_HOME=<location where java was installed>
export ANT_HOME=<location where ant was installed>
export JONAS_ROOT=$HOME/cluster/JONAS_4_8_3
export PATH=$PATH:$JAVA_HOME/bin:$ANT_HOME/bin
Windows Notes:
JAVA_HOME <location where java was installed>
ANT_HOME <location where ant was installed>
JONAS_ROOT c:\cluster\JONAS_4_8_3
Add to PATH ;$JAVA_HOME/bin;$ANT_HOME/bin
For this sample, Apache will run as <user> (rather than
'root').
Below, <prefix> refers to the install folder for Apache.
This sample uses prefix = $APACHE_HOME=
$HOME/cluster/apache2.
Run and Stop Apache HTTP server to verify the installation.
Notes:
Run and Stop Apache HTTP server:
For further information about installing Apache HTTP server please refer to the Apache Site.
Mod_jk will be installed in the same <user> account as Apache.
A mod_jk.so file should now have been created under $APACHE_HOME/modules.
The process for making apache aware of this new file will be performed in the
next chapter.
Note: For some distributions, a binary version may be
available at the Tomcat site.
For further installation information, refer to the Tomcat Site.
For further installation information, refer to the Tomcat Site.
The localhost must be mapped to a non lookback IP by editing the hosts file: either /etc/hosts in a linux system or c:/Windows/system32/etc/hosts for the Windows OS.
Note: A WebApp deployed into a Cluster must have a
special distributable element set in its WEB-INF/web.xml.
The following is an example of a web.xml deployment descriptor:
<web-app . . .>
. . .
<distributable />
. . .
</web-app>
Please carefully read the Tomcat Clustering Guide for additional information.
Note: For sampleCluster2, in the JOnAS-specific deployment descriptor, tag shared is set to true for the entity beans involved. When this flag is set to true, multiple instances of the same entity bean in different JOnAS servers can access a common database concurrently.
The following is an example of a deployment descriptor generated by newjc with the flag shared set to true. Deployment descriptors are in jonas_ejb_jar.xml in the ejbs.jar file in sampleCluster2.ear.
<jonas-ejb-jar>
<jonas-entity>
.
. .
<shared>true</shared>
.
. .
</jonas-entity>
</jonas-ejb-jar>
sampleCluster2 is located under $JONAS_ROOT/examples/sampleCluster2.
/lib libraries needed by the aplication to run
/output generated ear, jar, war files
/src source code
Note: sampleCluster2 contains both a war file for the web application and a jar file for the EJB. JOnAS will only deploy the war file to instances with a web container. Similarly, it will only deploy the jar file on instances with an EJB container.
The following graphic shows an example "SessionServlet Output" page.
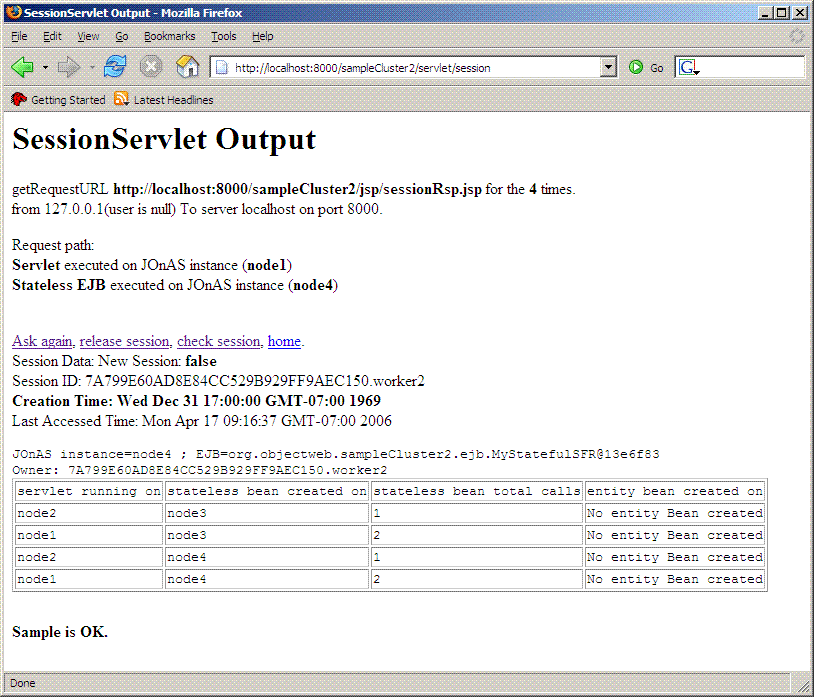
The following is an explanation of the information shown in the "SessionServlet Output" page above.
Home of sampleCluster2
After click on open session link
After click on check session link


